360 Video, also known as VR video, is just as similar to shooting 2D video as it is different. There is a couple of key differences you’re going to want to keep in mind to help ensure your next 360 video piece turns out great.
Learn about our 360 filmmaking services here:
Rule #1: Think about the camera as a character.
One of the greatest things about 360 video (and VR) is that you now have the ability to create a sense of presence within the viewer. You can make that person feel like they’re actually sitting in the room with your characters. The simplest way to do this when shooting 360 video is to think of your viewer ‘as a character’ in the scene. If you were going to be sitting or standing in this room or scene, where would you want to be? What perspective would make the most sense if you were taking part in the conversation? Put your camera there. This will help create a sense of presence and immersion inside your 360 video.
You can also use this same idea to create tension or emotion in your scene. Think about the last intimate conversation you had with a friend? You were likely sitting a lot closer to that person than you were the last time you caught up with your boss!? We also recommend you check camera site lines and heights in a VR headset before you shoot. Distance and perspective in 360 video (and VR) doesn’t always match reality.

Rule #2: Mind the stitch.
Most 360 video cameras have at least six outward-facing lenses (we love the professional line of cameras from Insta360). In the post-production process, you’ll have to stitch all six of those raw video files together to create one single spherical video. This spherical video, or equirectangular video, is what will be used in your final edit. If your stitch lines aren’t super clean, it can be a huge distraction to viewers, causing a break in the immersion you’ve worked so hard to create.
Stitching software (we really like Mistika VR) has gotten a lot better in recent years and can do about 90% of the work for you, but you’ll still have to go in and manually fine-tune most of your stitch lines. This process can be very time consuming, and in some cases almost impossible to get correct.
The single easiest way to avoid having stitching errors in your 360 video is to keep your action off of the stitch lines (or where two camera lens overlap). When you set up your scene and position your camera, place your main characters and centers of high action in the middle of a single lens. This will give your talent plenty of space to move around in the scene and not cross a stitch line.
To clarify, having actors cross stitch lines or having action unfold and move through a stitch is OK, just keep in mind that these areas can be incredibly hard to fix in post.
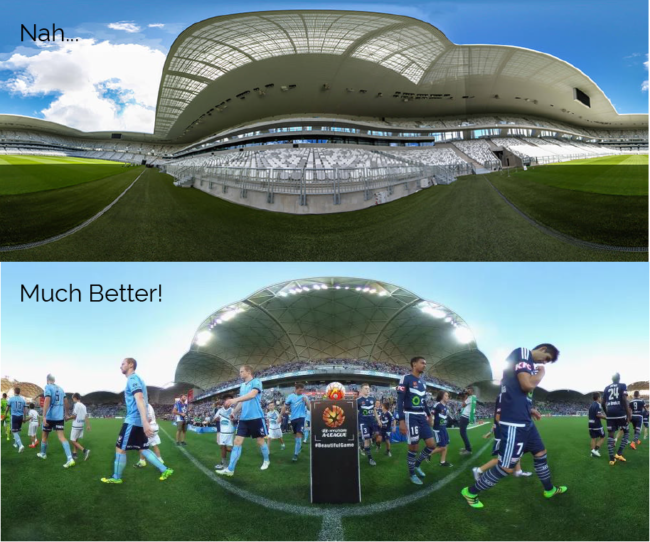
You can see what a stitch error looks like on the left side of the picture below.

Rule # 3: Do not forget about sound!
Audio is important in any video and I believe it is even more important in 360 video. One of the great things about 360 video is that the user now has the ability to look around anywhere they choose. However, as a director, this can also cause a number of challenges. You no longer have the ability to ‘cut to the close up’. If there is a very important plot point about to unfold in your film, how do you get the user to turn their head or look at the ceiling or at their toes!?
In addition to helping control the viewer and call attention to important scene elements, an overall rich spatial audio track can also help add layers of immersion to your 360 video. Spatial audio is a form of audio capture and mixing that takes a full 360° scene into account. Basic 4-channel spatial audio allows you to mix to the front, rear, left and right channels. MOst complex spatial formats allow for above and below audio mixing as well. Spatial audio remains centered in front of the viewer even as they tuen there head. This helps keep the viewer orientated in the right direction and adds additional layers of immersion and realism to VR and 360 video.
The Zoom H3-VR Spatial 360 microphone is a great entry-level option to get started.

Rule #4: Move with caution.
One of the biggest complaints you hear about any type of VR is that it makes people nauseous or leaves them feeling sick after just a few minutes of viewing. 360 video is unfortunately notorious for making people feel uncomfortable in a VR headset. VR motion sickness can be caused by less than optimal frame rates (30fps minimum on 360 video, 60fps minimum on rendered VR), but more likely than not, it is caused but locomotion issues, or in the case of 360 video, unwarranted camera movement.
When your eyes tell your brain that you are moving (forward, sideways, backward, etc) but your inner ear (the part of the body that helps us balance and gives us a sense of motion) doesn’t register that movement, your brain turns to survival mode, and you run for the nearest bathroom. Your brain actually thinks you’ve been poisoned and is trying its best to rid that toxin from your body. It’s probably a good thing our reptilian brains are still functioning, but not such a good thing for high-movement 360 video or VR.
The easiest way to avoid making your audience sick is to move your camera with absolute caution and reservation. If you do choose to move your camera, do so as slowly and smoothly as absolutely possible. If you are considering a camera move in your scene, I would challenge you to ask yourself first, ‘is this absolutely necessary in the telling of my story.’ More likely than not, you can avoid the camera movement altogether and save the risk of making your audience uncomfortable..
If you do decide to move the camera, one trick is to place the viewer ‘inside’ of something. This could be as simple as adding a helmet to the viewer’s perspective (as we did in Look Twice), placing them in a car, canoe, bike, etc. Placing the viewer on or in something stationary while the scene moves around them can help reduce the sensation of motion sickness in VR and 360 video.
Rule # 5: Fill the scene.
I see a ton of 360 video that is so close to being great. However, I think some creators forget the cardinal rule (and coolest part) of 360 video, the viewer can now has the ability to look anywhere they choose!
It’s easy to stage an amazing story right in front of the viewer, but what’s happening to their left, what’s happening to their right? In order to help ensure you are using 360 video to the fullest, I would suggest you also considering adding detail or telling secondary stories in the space to the left, right, above or below the viewer. This will help your 360 video stand apart from other VR pieces and can also add a cool layer of discovery in you film, encouraging viewers to watch the piece more than once.

Rule # 6: Don’t be afraid to say no.
I know it’s hard to say no and it’s really hard to say no if someone’s willing to pay you to do something. However, 360 video is not a solution to every problem. It’s a tool in your tool kit as a creator. In my opinion, there is a lot of video content that shouldn’t be shot in a 360 format. It would make a much better story if told through the lens of a professional 2D camera!
However, when the time is right, shooting 360 video can be an incredibly powerful tool. In some cases up to 200% more effective when compared to traditional 2D video. You just need to understand why you’re going to be shooting in that 360 format. The next time the opportunity arises to tell an amazing story, ask yourself, does this make sense to shoot in VR or 360, or would this story be better told in a traditional 2D format?
Fun challenge: You can also get creative blending 360 and 2D video, and really keep your audience on their toes!
Keep these 6 rules in mind the next time you’re brainstorming a 360 video project to help ensure that your experience comes out professional, comfortable and engaging.
Thanks for sticking with us and making it all the way to the end. If you have any questions, would like to discuss a project idea or are just wondering where to get the best donuts in town, don’t hesitate to reach out and say hi! We are here to help.


